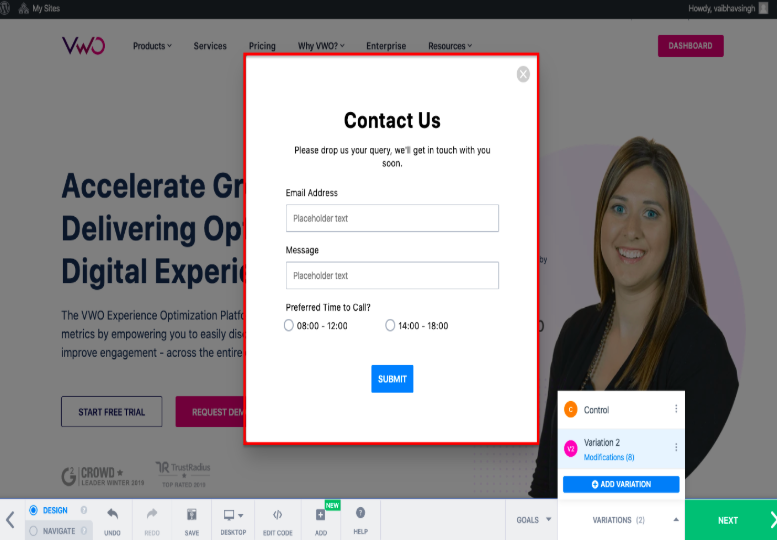
VWO allows you to add forms on your website without code using Widgets. You can create variations of your webpage with these forms directly from the VWO Visual Editor. Forms are typically required when you want to collect some data from your website visitors. For example, during user registration, you would like to collect information such as name, email address, phone number, etc.
Using the VWO Visual Editor, you can either modify an existing HTML form on your webpage, or you can create a new one without writing a single line of code. Using VWO Widgets, you can add pop-up forms to your website. To learn more about VWO Widgets, refer to Widgets in VWO.
Forms are a great way to get information about your visitors in many ways, such as event registrations, creating a quick opinion poll, and much more. Also, if you have access to accurate information from your visitors, you can better engage your visitors and retain them. To obtain visitor inputs, you can get visitors’ responses in several ways, such as text fields, clicks on buttons, radio buttons, checkboxes, drop-down boxes, etc.
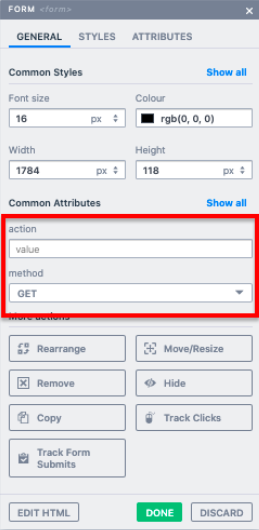
VWO allows you to control the action associated with the submit button, i.e., you can decide HOW and WHERE the data will be submitted as soon as the user submits the form. This is achieved using the action and method attributes that can be set using the VWO Editor. The action attribute specifies where the data is being sent, while the method attribute determines how it is being sent.
The ACTION Attribute
The action attribute lets you define where the form submits the content of its fields when the user clicks submit. In VWO, you can configure the action attribute in the Edit Element dialog of the VWO Editor. The value of this field must be a valid URL. For example, if you wish to send the visitors’ data to an absolute URL- "http://example.com/form/submit"-enter this URL in the action field.
The METHOD Attribute
The method attribute lets you define how the data is sent to the server. To do this, VWO supports the two most common ways to transmit the form data, the GET method and the POST method. This attribute is also configurable from the Edit Element dialog of the VWO Editor.
If you choose to submit your forms data using the GET method, then the data sent to the server is appended to the URL as a series of name/value pairs. At the end of the URL, a question mark (?) is appended followed by the name/value pairs, each one separated by an ampersand (&). For example, scriptname.php?name=Bob&age=30.
Likewise, when you choose to submit your forms data using the POST method, the fields' values are passed in the request body and will not be visible in the URL. Since the POST method does not append the actual values in the URL, this is more secure when you are sending information that could be sensitive.
Things to Consider While Working with Forms in VWO
- If you send your form data to the server, please ensure that you have the code in place such that the frontend elements communicate with the backend code. For example, if you add a new field to your form, say “Phone Number”, you need to write the backend logic to store the data of this field in the database.
- If you remove a field from the form that has validation in the backend, you must make changes to the back-end code before you roll out the variation to your visitors as it will give run-time errors and will not let the visitors submit the form.
- With HTML forms, you can submit data on other domains as well.
- If you wish to track the performance of your form, you can set up a form analysis campaign under Insights. To know more about setting up a form analysis campaign, refer to How to Track a Form Using VWO.
Example Scenario - 1
"In a sign-up form, you already collect name and email address. Now, you also want to add the Company name field to the form."
To achieve what’s stated in the example scenario above, use VWO Editor. It allows you to create new components in your webpage. You can create a new component on your webpage using the Add option present in VWO Editor.
Procedure
- Login to your VWO account.
- Go to Testing > A/B.
- Click CREATE to create a new A/B Test campaign.
- In the Enter URL of the page you want to test field, enter the URL of the webpage you want to test.
NOTE: To include or exclude URLs from the campaign, click the ADVANCED tab next to the URL field. Using this tab, you can also define advanced pattern-matching options to include a broad URL with wildcard entries or a specific URL. To learn about using different URL patterns, refer to Using URL Patterns in VWO. - From the What hypothesis are you testing? dropdown, select a hypothesis you want to work with. This is an optional step.
NOTE: If you do not have a hypothesis yet or wish to create a new one, you can do so by clicking on the Create a New Hypothesis option at the bottom of the hypothesis dropdown. To learn more about the hypothesis, refer to Hypothesis in VWO.
- Click Next.
Your test page containing the form opens in VWO Editor. - To add a new company name field in your form, click the Add button.
Add Element dialog appears.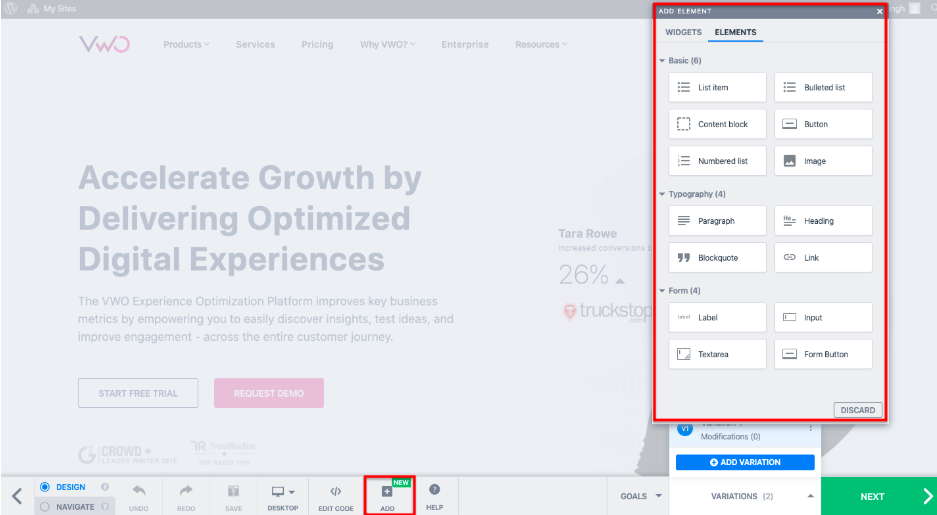
- From the Add Element dialog, add a Label and an Input element corresponding to it.
- Hover on the page to choose the positioning of the element. On mouse hover, a green color tooltip starts to appear, indicating where you can position the element.
INFO: The tooltip has the info about what element is being placed and where is it being placed. The tooltip format is- "Add <element name><before/after/inside> <hovered element type>"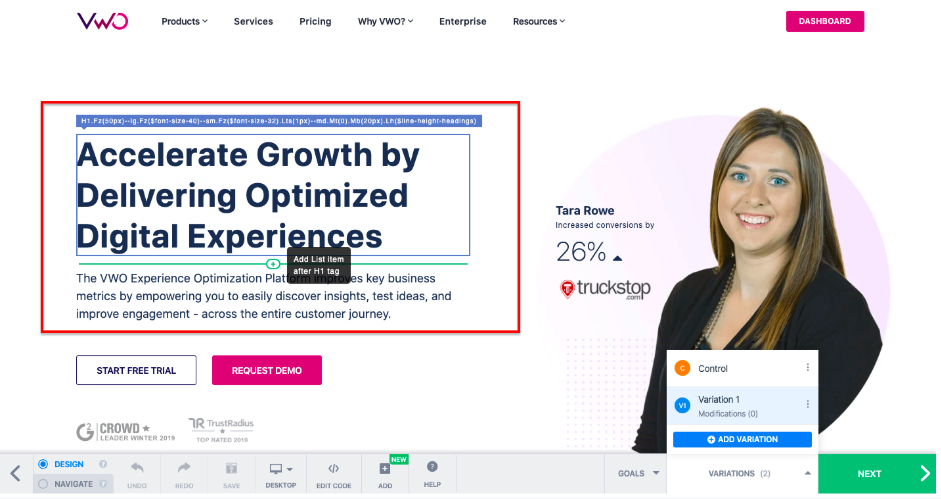
- Click the area where you want to add the element.
NOTE: You can place the element anywhere on the page (before, after, inside) with respect to an existing element. These options appear based on the type of element you are hovering over and the element you are adding. - Once you have positioned the Label and Input elements on your webpage, the next step is to modify their properties and attributes. To do this, click on the Label element.
The Add Element dialog appears. - Go to the GENERAL tab, and in the Text field, enter the label name.
- To configure where the form submits the content of its fields, go to the Common Attributes section and enter a valid URL in the action field.
The action and method attributes are only visible when you click on the parent element form tag. - To configure how the data is sent to the server, go to the Common Attributes section, and specify the desired method from the method dropdown.
- Click Done to save your changes.
- Likewise, you can configure the Input element as well.
NOTE: To make a field mandatory, enable the required attribute present in the Common Attributes section. - The next step is to make the frontend communicate with the backend. For this, the backend code must be in place.
Example Scenario - 2
"Adding a new form from scratch using Widgets."
To achieve what’s stated in this example scenario, add a Form widget using the VWO Editor. To add a form on your webpage, perform the following steps.
Procedure
- Login to your VWO account.
- Go to Testing > A/B.
- Click CREATE to create a new A/B Test campaign.
- In the Enter URL of the page you want to test field, enter the URL of the webpage you want to test.
NOTE: To include or exclude URLs from the campaign, click the ADVANCED tab next to the URL field. Using this tab, you can also define advanced pattern-matching options to include a broad URL with wildcard entries or a specific URL. To learn about using different URL patterns, refer to Using URL Patterns in VWO. - From the What hypothesis are you testing? dropdown, select a hypothesis you want to work with. This is an optional step.
NOTE: If you do not have a hypothesis yet or wish to create a new one, you can do so by clicking on the Create a New Hypothesis option at the bottom of the hypothesis dropdown. To learn more about the hypothesis, refer to Hypothesis in VWO.
- Click Next.
Your test page opens in the VWO Editor. - Now, using the VWO Editor, you need to add a new banner widget to your webpage.
- To add a widget, click the Add button.
- In the Add dialog, you’ll see the WIDGETS tab. From the Modals section, click the Form pop-up.
The Form pop-up widget gets added to your webpage.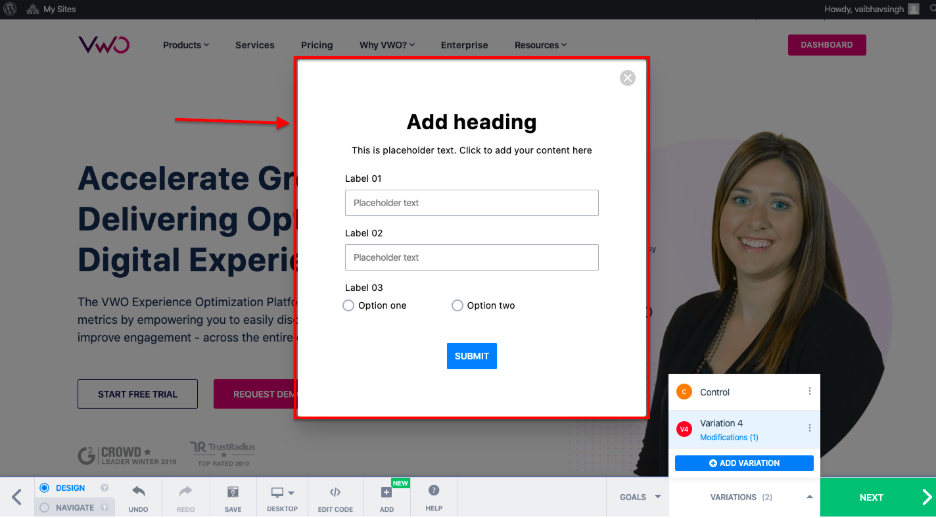
- The next step is to modify the content of the form. For this, click the content on the form that you want to modify. Say, you click on Add Heading.
The dialog to configure the banner appears. - In the dialog, click the Edit Element option.
The Edit Element dialog appears. - Go to the GENERAL tab, and in the text field, enter- “Please drop us your query, we'll get in touch with you soon”.
- Click DONE.
- Likewise, you can modify every element present on the form widget per your requirements.
NOTE: You can also add more elements to your form using the ADD ELEMENT dialog. To learn how to do this, refer to Adding Elements on your Webpage Using VWO Editor.
Post-requisite
Once done executing all the steps of the above procedure, your form would look like this:
