VWO Engage (formerly PushCrew ) now has a Personalization feature using which you can create Custom Attributes like Name, Product Name, Price and much more to be used in your push notifications. These attributes will be mapped to the respective subscriber IDs and thus you will be able to send very personalized and targeted notifications.
NOTE: This feature is available in Enterprise plan only.
How do I create a Custom Attribute?
Here’s how you can create a Custom Attribute on your VWO Engage account :
1. Login to your VWO Engage dashboard. Click on the Account Settings icon on the top right-hand side of the panel. Click on Custom Attributes.

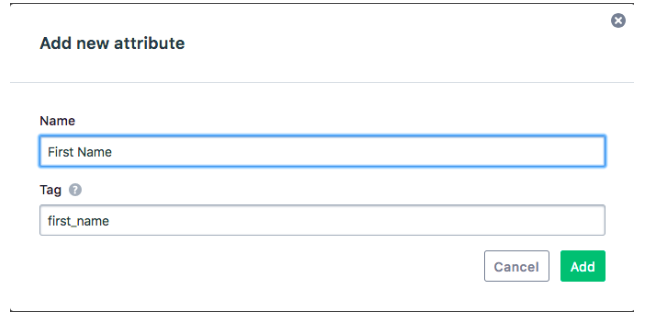
2. To add a new attribute, click on “Add New”. Enter the name of the attribute you want to create. Eg: First Name.
3. Once the Name of the attribute is added, its tag will be created automatically. You can choose to edit it if required. Once done, click on “Add”
4. You will now see the “First Name” attribute in the list. Copy the “Code Snippet” field and paste it in the code of your website page where you’re collecting the attributes from anywhere before the closing of the head tag i.e., </head>
Every time the page loads, this Code Snippet too will load. Here’s an example of how the code for ‘Product Name’ attribute will work :
In this snippet, the value tag which you are parsing for Product Name at your end will be parsed to VWO Engage for personalized notifications. Here’s how to do this :
Example Code Snippet :
<script>
var Product_category = 'Dog Food';
</script>
<script>
window._pcq = window._pcq || [];
window._pcq.push(['tag', 'product_1', Product_category]);
</script>
In this case, we have simply passed the value of variable ‘Product_category’ as ‘Dog Food’ and the same will be used for sending personalized notifications.
You can similarly pass the global variable values from the page to personalize your notifications.
The only thing you would need to do is pass the variable value in the Code Snippet in place of the <value> field.
You can create a maximum of 10 Custom Attributes at a time.
How to use Personalization while sending notifications?
Login to your VWO Engage dashboard. Click on Send Push Notification.
Example 1: First Name and Last Name
- Let’s suppose you want to use the ‘First Name’ and ‘Last Name’ attributes to address subscribers by their name in the notification.
- In the Title field, enter your message and then click on the icon in the extreme right of the Title field. You will see all the Custom Attributes created by you here.
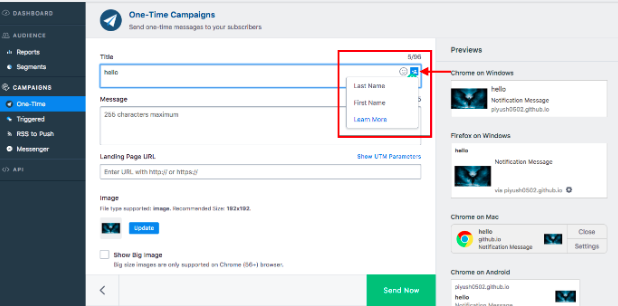
- Select ‘first name’ and last name’ from the drop-down. Here’s how it will look in the Title field. Please note that the names of custom attributes will be different depending on how you have created them.
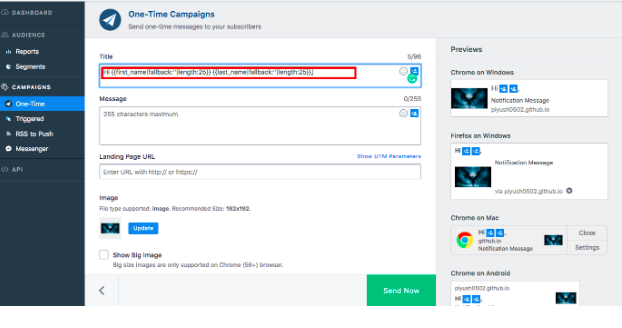
We strongly recommend adding a fallback text such as ‘there’ inside the ‘’ next to ‘fallback:’, so in case the value is not available, the message would be sent as “Hi there” instead of just “Hi”. You can also specify the length at which you would like to clip longer names.
- Enter the other details such as Message, Landing URL, Big Image, CTA Buttons etc and click on Send Notification. Here’s how the notification will appear :

In this example, “Jon” is the first name and “Doe” is the last name of that particular subscriber.
Example 2: Using the First Name in Title and Product Name in Message :
- Let’s suppose you want to use the ‘First Name’ attribute in the Title and ‘Product Name’ attribute in the Message.
- In the Title field, enter your message and then click on the icon in the extreme right of the Title field. Select the ‘first name’ Custom Attribute from the drop down.
- In the Message field, enter your message and then click on the icon in the extreme right of the Message field. Select the ‘product 1’ attribute.
Please note that the names of custom attributes will be different depending on how you have created them. Here’s how it will look in the Title and Message fields :
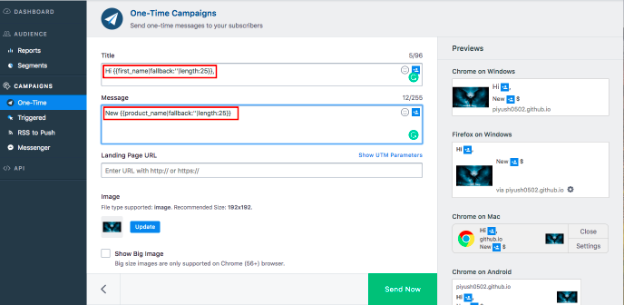
- Enter the remaining details and click on Send Notification. Here’s how the notification will appear :

In this example, ‘Jon’ is the first name of the subscriber and ‘Sample Product’ is the name of the product.
How do I discard a Custom Attribute?
- To discard, go to the Custom Attributes page and click on the options button. Then click on Discard
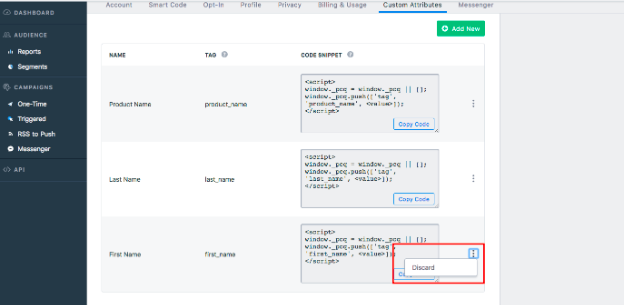
- You will now see a Warning message showing you messages and campaigns this attribute has been used in. Click on ‘Yes, remove it’ in order to discard the attribute.
Note: Please remove the discarded attribute from any scheduled notifications, Welcome Drip messages and Triggered Campaign messages where it was being used. In case it is not removed, notifications sent hereon will either display the fallback text (if added) or a blank space in place of the text of the attribute.
Sending only Custom Attributes in Push Notifications :
If you do not add any text in the Title and Message fields beside the Custom Attributes, your notification will not be sent and you will see the below message :
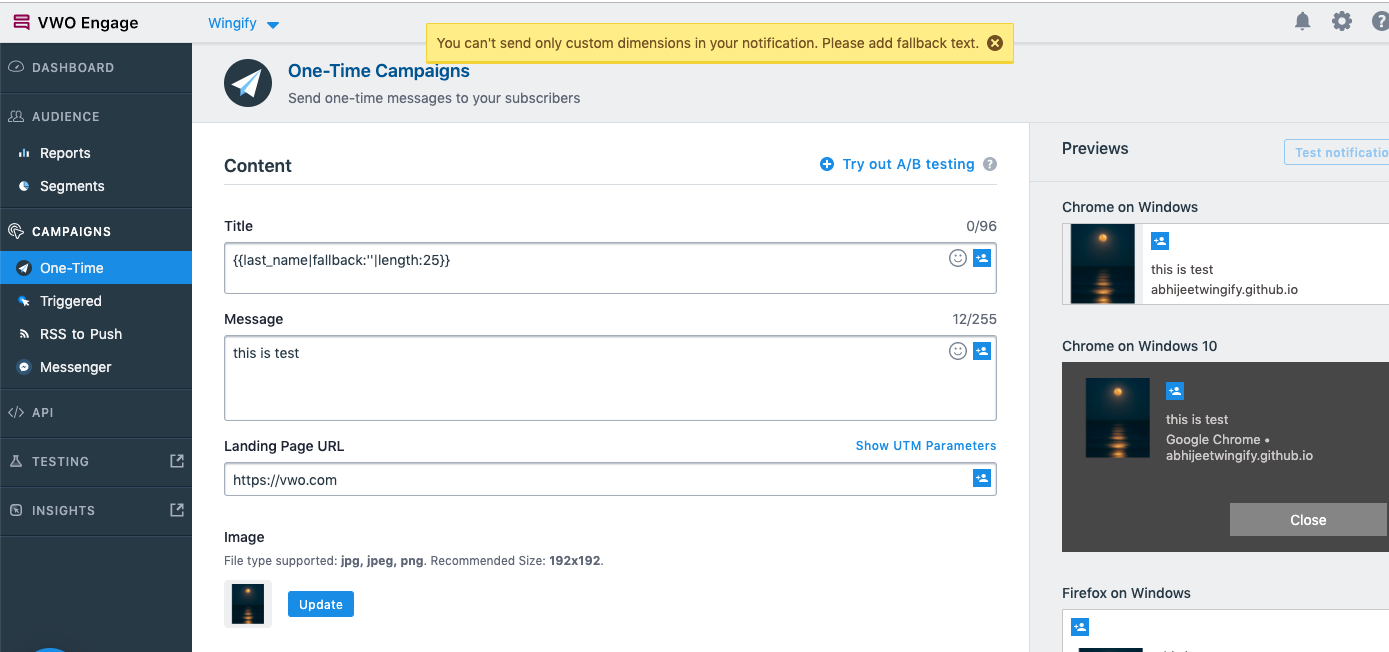
We do this to ensure that in case some values are not available for subscribers, the Title/Message will be rendered blank for subscribers.
In case a fallback text is specified, the notification will be sent. You can also add static text such as numbers from 0-9 or alphabets from A-Z.
FAQ’s
What is the permissible limit for the length of the Custom Attribute value sent to VWO Engage?
As you know, the maximum length for the Title of the Push Notification can be 96 characters and that for the Message can be 255 characters.
Here are the permissible character limits while creating a new Push Notification with attributes:
- For Title : Custom Attribute + text = 96 characters.
Since the character length of the custom attribute is not defined while creating the notification, we will not take its length into consideration and you will be allowed to enter a maximum of 96 characters in the Title field. However, while sending the notification, only the first 96 characters will be sent. Eg: If the notification title begins with a custom attribute of 10 characters, then that along with the first 86 characters of the text will be sent to subscribers.
- For Message : Custom Attribute + text = 255 characters.
Here too, since the character length of the custom attribute is not defined while creating the notification, we will not take its length into consideration and you will be allowed to enter a maximum of 255 characters in the Message field. However, while sending the notification, only the first 255 characters will be sent. Eg: If the notification message begins with a custom attribute of 30 characters, then that along with the first 225 characters of the text will be sent to subscribers.
What is the data type accepted for Personalization?
The data type accepted is String values only.
What are the implications of Personalization on GDPR compliance?
As the data collector, you will need to ensure that you have the necessary permissions to store and process the data that you are sending VWO Engage. VWO Engage (the processor) will process subscriber data only on instructions from you (the controller)
Which all fields is Personalization available in?
Personalization is available in the following fields while sending a One-Time Campaign :
Title
Message
Landing Page URL
UTM Parameters
The VWO Engage Personalization feature can be used in the following features :
- Send Push Notification
- Schedule Notification
- Welcome Drip
- Triggered Campaigns
In case you have any queries with regards to using Personalization in VWO Engage notifications, shoot an email to support@pushcrew.com and we’ll be happy to help :)
